Your Step-by-Step Guide to Install and Setup Java
Hi Friends, This is a step-by-step guide to help you install and setup Java in your Windows or Linux System.
Previous Topic: Top 5 Reasons Why Java is Popular
Next Topic: Write Your First Java Program
Install And Setup Java in Your System
To write programs in Java, first, you need to install the Java development kit (JDK) in your system.
Java Development Kit (JDK)
JDK is the software for Java programmers to develop a Java application. JDK contains tools and library files to build Java applications.
Some tools in the JDK are Java compiler (javac), Java application loader (java), Java Disassembler (javap), Java document creator (javadoc), etc.
JAVA Runtime Environment (JRE)
JRE is the software to run Java applications. If you just want to run Java applications, then you only need to install JRE.
JDK is for developers. JRE is for anyone who only wants to run a Java program.
JRE includes Java Virtual Machine (JVM) and the Java core class libraries.
JAVA Virtual Machine (JVM)
JVM is a virtual machine that creates the environment to run Java applications. It is inside the Java Runtime Environment.
JVM is the translator in Java. JVM translates the byte code into the machine code and runs Java programs.
JVM calls the main method to start the execution of a Java program.
JVM manages and optimizes the program memory.
If you have JVM installed in your system, that means you can run any Java program.
Before learning ‘Where to download JDK or How to install and setup Java‘, You must understand the Java platforms/editions available and the difference between each of them.
- Java Platform, Standard Edition(Java SE)
- Java Platform, Enterprise Edition(Java EE)
- Java Platform, Micro Edition(Java ME)
- JavaFX
Java Standard Edition (Java SE)
Java SE defines all the core features and functionalities of the Java programming language. It contains packages like java.lang (contains the basic fundamental Java classes), java.io(classes for input-output operations), java.net(classes for networking), java.util(contains Java collection classes, Date and time classes, etc), etc.
Using Java SE, We can develop small command-line applications as well as Graphical User Interface (GUI) applications. It can be used for networking and database access, etc.
Apart from the core functionalities, Java SE contains the development tools, the virtual machine, and other libraries.
It was known as J2SE(Java 2 platform, standard edition) from java 1.2 version to 1.5 version. Java 2 was used to denote the major changes that came in the 1.2 version. The ‘2‘ was later removed in the 1.6 version.
Java Enterprise Edition (Java EE)
Java Enterprise Edition is built on top of Java Standard Edition. It contains everything in Java SE + the APIs and the runtime environment for building large-scale, scalable and secure enterprise applications. That’s the difference between Java SE and Java EE.
Java Micro Edition (Java ME)
Java Micro Edition provides the APIs and the virtual machine for building applications that run on small devices like mobile phones.
JavaFX
JavaFX is used to create rich internet applications and desktop applications using its lightweight user interface APIs. It’s like the swing framework in Java. From Java 11 release, Oracle has an open-source version of JavaFX known as OpenJFX.
Hope you have understood the different platforms in Java. Now, let’s learn the steps to learn how to install and setup Java.
First Step: Download The Java Development Kit (JDK)
As we know, Java is an open-source programming language. You can download the open-sourced version of JDK from the OpenJDK website or the licensed version of the Java development kit from the Oracle Website.
If you don’t know the difference between these 2 JDK versions, check out the previous topic and you will get an idea about it.
If you are a Java beginner, you don’t need Java EE, Java ME, or JavaFX. What you need is the Java Standard Edition (Java SE). Because it’s the base version that contains all the Java core features, and that’s exactly what you need as a beginner.
Click here to download the latest open-sourced Java SE version. The latest version available now is Java 14. So, I use Java 14 to guide you in this tutorial to install and setup Java in your system.
Oracle provides JDK 14 builds for Windows (x64), Linux (x64), and Mac OS (x64) on the OpenJDK website. OpenJDK website provides the .zip, .tar.gz archives of the JDK builds. So, We can simply extract it and use it.
If you want to download the non-open-source licensed version of JDK from Oracle, click here. Oracle has both JDK archives and the installation setup files on their official site. You can download either of them. To download, click on the specific JDK for your operating system, agree on their license agreement, and click download. that’s all.
If you download the archives, then you can keep it on your system separately. It won’t affect the other JDK installations.
Well, let’s go to the second step to learn how to install and setup Java in Windows and Linux.
Second Step: Install JDK and Set-up Java Environment
Install JDK on Windows
If you are using the Windows operating system to install and setup Java, you can download the .exe file or the zip file.
If it’s the .zip file, then just unzip it, as I already said, and copy it to the directory you want.
If it’s the .exe file, to install JDK:
- Double click on the file.
- The Java installation dialogue box will appear. Click on the Next button.
- Choose the installation location(by default it will in the C:\Program Files\Java) and click next.
It will take a little time to install.
That’s it. You have your JDK installed.!
Now you can either close the dialogue box or click on the ‘Next Steps’ to see the documentation.
Set-up Java Environment In Windows
Step 1: Open System Properties
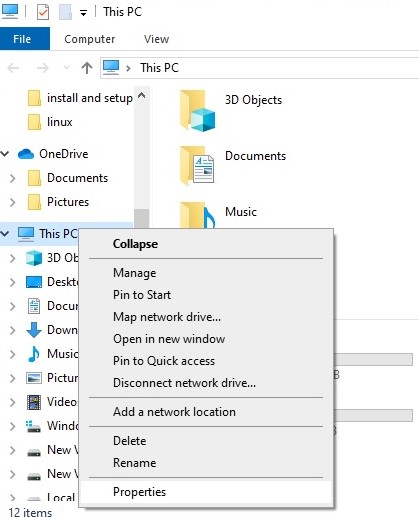
To open the properties, right-click on the ‘My Computer’ or ‘This PC’ icon (according to your windows version) and select ‘properties’.
Step 2: Select Advanced system settings on the top left corner

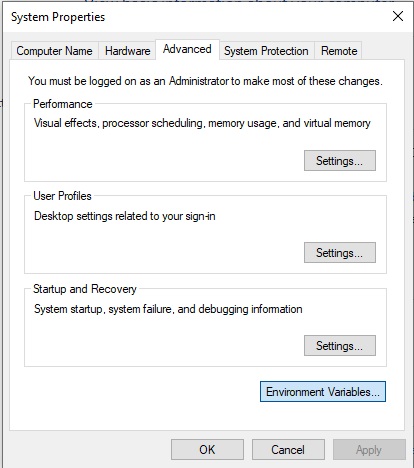
Then the ‘System Properties’ dialogue box will appear.
Step 3: Click on the Environment Variables button
Now the environment variables window will be open and you will see the user variables and system variables sections. In both of the sections, you will see the Path variable.
If you want to set the Java environment for the current user only, then choose the Path variable in the user variables section. Or choose the Path variable in the system variable section to set the Java environment for all the users.
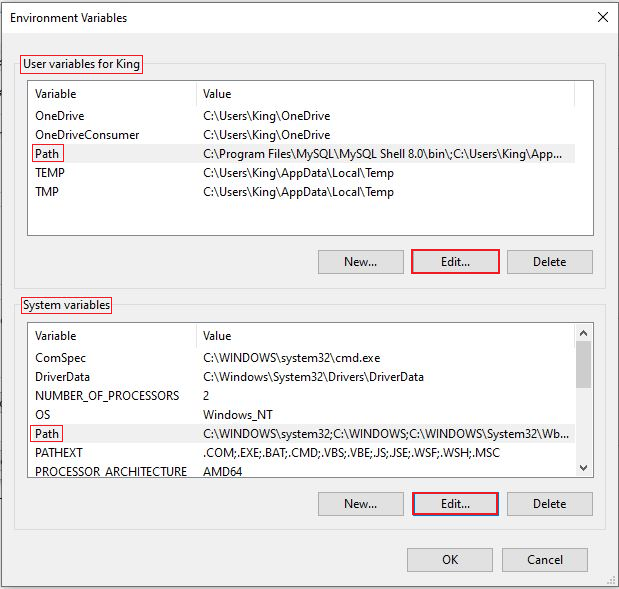
Step 4: Select the Path variable and click on the Edit button
When you click on the Edit button, you will see the Edit System Variable/Edit Environment Variable window.
If you are using the older Windows version, then you can see all the variable values in the Path variable separated by a semicolon. What you need to do is go to the end of the variables and put a semicolon if it’s not already there. Then paste your JDK\bin path there. And put another semicolon at the end. Then click OK.
Example: C:\Program Files\Java\jdk-14.0.2\bin
If you are using the newer Windows version, you will see a window like below.
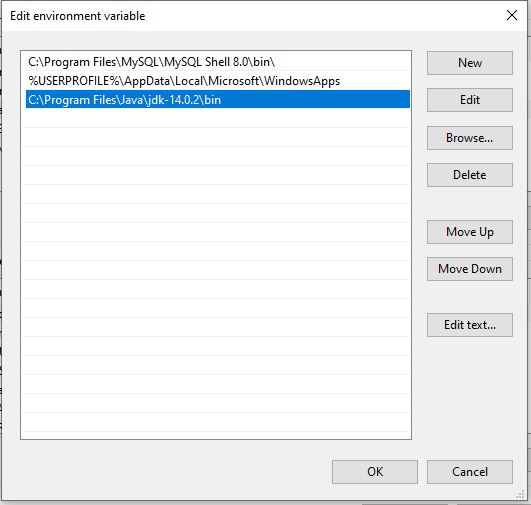
Click on New and paste the JDK\bin path and click OK.
Now the Java environment variable is set.
Step 5: Click on the ‘New’ button under the ‘user variables’ or the ‘system variables’ section in the environment variables window.
Enter the variable name as JAVA_HOME and in the ‘Variable value‘ text box enter your JDK path and click OK.
Example: C:\Program Files\Java\jdk-14.0.2

Note: Don’t include the bin folder here. The jdk root folder path is what we want here.
Now open the command window and enter the command java –version and you can see the installed JDK version.

There you go. Install and setup java in windows is done. Now you can start building your Java applications.
Install JDK on Linux
With the Linux operating system, you have three options to choose from the Oracle website. Those are The Debian package (.deb) or The RPM package(.rpm) or the archive file (.tar.gz). There is only one option to choose from the OpenJDK website. That is the archive file (.tar.gz).
Now, Let’s look at how to install and setup Java in Linux.
The first step is to open the terminal window by entering ctrl+alt+t and change the directory to the JDK downloaded folder use the ‘cd‘ command. For example, if the JDK is downloaded in the ‘Downloads‘ folder, enter cd Downloads on the terminal.
Or you can open the downloaded folder and right-click and select ‘open in terminal‘.
You can enter the command ‘ls‘ if you wish to list the items in the folder.
How to Install The JDK Debian(.db) Package
Debian package is provided for the 64-bit Debian based Linux platforms like ubuntu.
Step 1: Enter the following command to install the debian package
| sudo dpkg -i <jdk_file_name.deb> |
jdk_file_name.deb is the name of the JDK debian package with the .deb extension.
Example: sudo dpkg -i jdk-14.0.2_linux-x64_bin.deb

Step 2: Enter your user password and press the Enter key

And that’s all you need to do. JDK is installed as you can see below.

Now, let’s take the case of the archive package.
How to Install The JDK Archive(.tar.gz) package
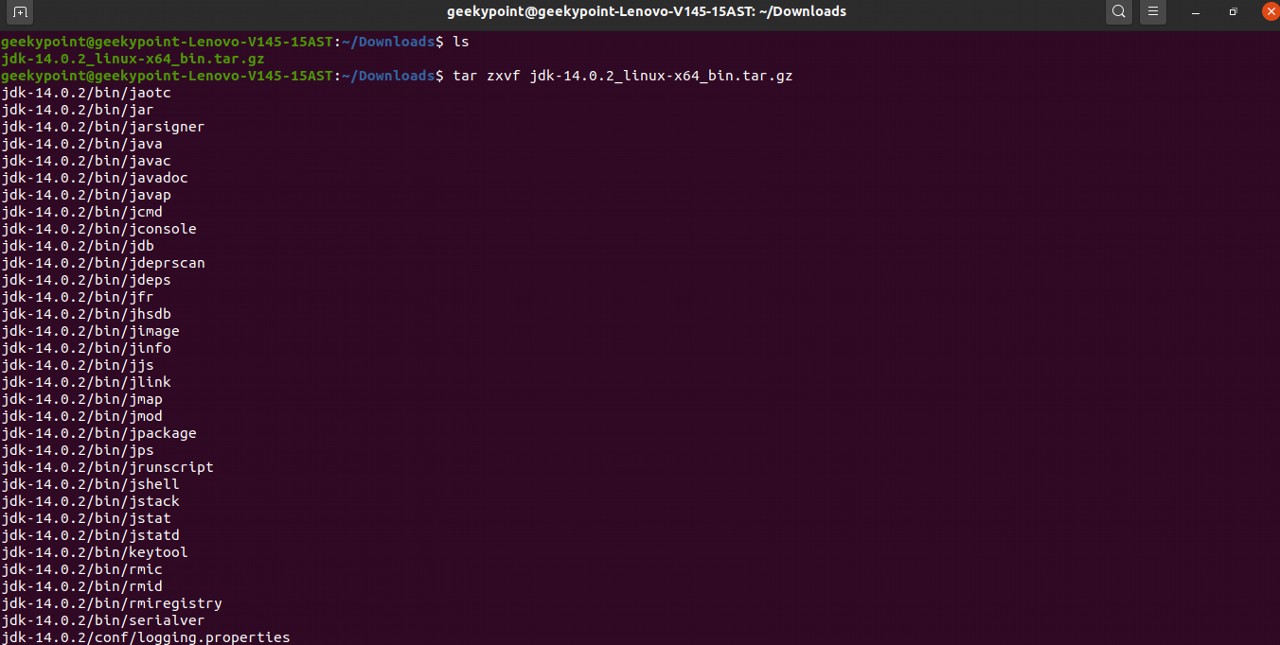
Step 1: Enter the following command to extract the archive package
| tar zxvf <jdk_file_name.tar.gz> |
Example: tar zxvf jdk-14.0.2_linux-x64_bin.tar.gz

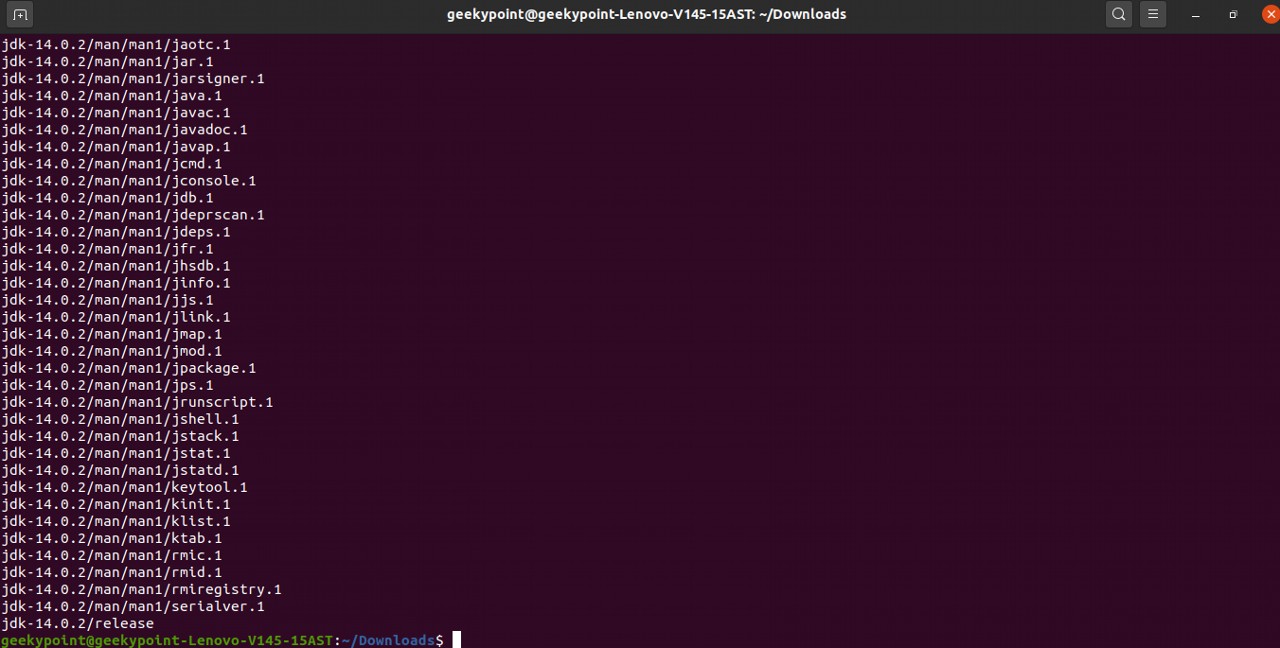
And press the Enter key. Enter your user password if prompted. Then the archive file will be extracted, as you can see below.
Step 2: Create a new directory for the JDK if you would like to
Here, my extracted JDK folder is in the Downloads folder. So I would like to create another directory for my JDK.
For creating a new directory, use the command below.
| sudo mkdir -p <new directory> |
Example: sudo mkdir -p /usr/lib/jvm/jdk-14.0.2/
Here I create the directory jvm/jdk-14.0.2/ inside the /usr/lib/ folder. jdk-14.0.2 is the version I use here, and that’s also the name of the extracted JDK folder. That’s why I use jdk-14.0.2 as my JDK folder name.

Step 3: Move the extracted folder to the new directory
Use the command below to move the items inside our JDK folder to the new directory.
| sudo mv <current JDK directory/*><space><new directory> |
Example: sudo mv jdk-14.0.2/* /usr/lib/jvm/jdk-14.0.2/
In the above sample command jdk-14.0.2/* denotes all the items inside the jdk-14.0.2 folder. and /usr/lib/jvm/jdk-14.0.2/ is our new JDK location.

How to Install The JDK RPM(.rpm) Package
RPM package is provided for the 64-bit RPM-based Linux platforms like Red Hat, SUSE, Fedora, CentOS, etc.
To install the .rpm package, you need to have the root user access.
Step 1: Enter the command ‘su’ to run the installation as the root user. Then, press the Enter key
Step 2: Enter the superuser password
Step 3: Enter the command below to install the rpm package
| rpm -ivh <jdk_file_name.rpm> |
Example: rpm -ivh jdk-14.0.2_linux-x64_bin.rpm
For more information, check out the Oracle Installation Instructions for the RPM package here.
Set-up Java Environment In Linux
After installing the JDK using the Debian or RPM or archive file, we need to configure the Java environment to compile and run our Java programs.
Our JDK is installed now, but if you enter the command javac (To compile the source code) or java (To run a java application) in the terminal, it will say that the command is not found.
To solve that, we need to add the information about these commands in our system by using the update-alternatives command.
Step 1: Enter the command below to enable the java command
| sudo update-alternatives –install /usr/bin/java java <location of the java command inside the JDK folder> 1 |
In the above command /usr/bin/java is the location where the information about the command ‘java’ is going to be stored. The alternative command will be created in the /usr/bin/ directory with the name java.
After ‘/usr/bin/java‘ you can see another ‘java‘. That is the command name.
In the place of <location of the java command inside the JDK folder>, you must enter the full path of the java command. It is inside the jdk-version/bin folder. In ubuntu 20.04, JDK is installed in the /usr/lib/jvm/ location. So the directory structure is like ‘/usr/lib/jvm/jdk-version/bin/java’.
The ‘1‘ at the end of the command is the priority set to the command.
Example: sudo update-alternatives –install /usr/bin/java java /usr/lib/jvm/jdk-14.0.2/bin/java 1

Now, if you enter the command java —version you can see the version details of the Installed JDK.

Step 2: Enter the command below to enable the ‘javac’ command
| sudo update-alternatives –install /usr/bin/javac javac /usr/lib/jvm/jdk-14.0.2/bin/javac 1 |

It is as same as what we did for the java command. Enter javac in the places of java. And that’s it. You can also add other java commands using the same way.
Step 3: Set JAVA_HOME in the environment file
Use the command given below to open the environment file using gedit.
| sudo gedit /etc/environment |

After entering the above command, the environment file will be open and you can see the current environment variables. To set JAVA_HOME, click on the end of the variables and press Enter. In the new line, type: JAVA_HOME=“<JDK path>”.
Note: You must enter the JDK path in double-quotes.!
Example: JAVA_HOME=”/usr/lib/jvm/jdk-14.0.2“. In here jdk-14.0.2 is the JDK root folder.

After entering JAVA_HOME click on the save button and close the file.
Well, these are the steps to install and setup Java in Linux. Now you are all set to write your Java programs.
To learn how to install and setup Java in macOS, check out the Oracle installation guide here.
Conclusion
In this tutorial, we have covered all the major steps to install and setup Java in Windows and Linux-based systems.
So, which JDK version are you going to install and set up in your system?
Did you find this guide helpful?
Let me know in the comments.!
Also consider sharing with your friends.! Thank you.
After you have completed the JDK installation successfully, check out the next topic: Write Your First Java Program

